
dtf transfer instructions
DTF Transfer Instructions: A Comprehensive Guide
DTF technology‚ evolving rapidly since version 8.19.0 (last updated September 30‚ 2025)‚ offers vibrant transfers. Optimal heat press settings range from 282°F to 350°F‚ with times between 9-12 seconds‚ ensuring durable‚ high-quality results.
Understanding DTF Transfer Technology
Direct-to-Film (DTF) transfer technology represents a significant advancement in garment decoration‚ offering versatility and durability previously unseen with traditional methods. Unlike older techniques‚ DTF allows for full-color‚ high-resolution prints on a wide array of fabrics – polyester‚ cotton‚ and blends – with excellent wash fastness. The process involves printing a design onto a specialized film‚ then transferring it onto the garment using a heat press.
Recent updates‚ like the version released on September 30‚ 2025‚ continually refine the process. Key to successful DTF transfers is understanding the interplay between temperature‚ time‚ and pressure during the heat pressing stage. Optimal settings vary based on the fabric composition‚ generally falling between 282°F and 350°F‚ with press times ranging from 9 to 12 seconds. Mastering these parameters is crucial for achieving vibrant‚ long-lasting designs.
What is Direct-to-Film (DTF)?
Direct-to-Film (DTF) is a revolutionary heat transfer process gaining prominence in the garment decoration industry. It involves directly printing water-based ink onto a PET film‚ which is then powdered with a hot melt adhesive. This creates a transfer that can be applied to various fabrics using a heat press‚ resulting in a vibrant and durable print.
Unlike screen printing or vinyl cutting‚ DTF doesn’t require minimum order quantities and excels at reproducing intricate designs with full color gradients. The technology‚ continually updated – with the latest version being 8.19.0 as of September 30‚ 2025 – offers a cost-effective solution for both small-scale and large-scale production. Successful application relies on precise heat press settings‚ typically between 282°F and 350°F‚ and appropriate pressure for optimal adhesion.
DTF vs. Other Transfer Methods (Vinyl‚ Screen Printing)
Compared to traditional methods‚ Direct-to-Film (DTF) presents distinct advantages. Vinyl cutting‚ while durable‚ struggles with complex‚ multi-colored designs and requires weeding‚ a time-consuming process. Screen printing‚ excellent for large runs‚ necessitates screen creation and setup costs‚ making it less viable for small batches or personalized items.
DTF bridges this gap‚ offering full-color capabilities without the limitations of vinyl or the setup costs of screen printing. It excels at intricate designs and gradients‚ achieving a softer hand feel than vinyl. While DTF requires a heat press – with optimal temperatures ranging from 282°F to 350°F – the overall process is often faster and more versatile. The latest DTF software version‚ 8.19.0 (updated September 30‚ 2025)‚ further streamlines the workflow‚ making it a compelling alternative.

Preparing for DTF Transfer
Successful DTF transfers demand careful preparation‚ including selecting appropriate film‚ configuring printer settings‚ and designing artwork optimized for heat press application.
Required Materials and Equipment
For embarking on Direct-to-Film (DTF) transfers‚ gathering the correct materials is paramount. You’ll absolutely need a DTF printer‚ capable of handling specialized inks. Crucially‚ acquire DTF pigment inks – these are formulated for film adhesion and washability. DTF film itself is essential; various types exist‚ so choose wisely based on your fabric.
A heat press is non-negotiable‚ providing the necessary temperature and pressure. Consider a garment steamer or iron for pre-pressing fabrics. You’ll also require a computer for design work‚ alongside design software like Adobe Photoshop or Illustrator. Don’t forget powder adhesive – this bonds the ink to the film. Finally‚ tools like a powder shaker‚ weeding tools‚ and parchment paper are incredibly helpful for a clean and efficient process. Having these items readily available will streamline your DTF journey.
Choosing the Right DTF Film
Selecting the appropriate DTF film is critical for transfer success. Different films cater to varying fabric types and desired outcomes. Cold peel films are ideal for applications where immediate peeling after pressing is preferred‚ often used with certain inks. Hot peel films‚ conversely‚ require cooling before removal‚ offering greater flexibility with ink choices.
Film thickness also matters; thicker films provide better durability and are suited for heavier fabrics. Consider the film’s compatibility with your printer – some films work better with specific print heads. Pay attention to the film’s adhesive properties; a strong adhesive ensures excellent ink bonding. Researching and testing different film brands is highly recommended to determine which best suits your specific needs and achieves optimal results for your DTF projects.
Printer Settings for Optimal DTF Prints
Achieving vibrant and durable DTF prints hinges on precise printer settings. Begin by selecting a high-quality print resolution – 1440 DPI is generally recommended for detailed designs. Utilize a bi-directional print setting to enhance speed without sacrificing quality. Color management is crucial; employ a color profile specifically designed for DTF inks to ensure accurate color reproduction.
Adjust ink density settings to optimize ink laydown‚ preventing bleeding or fading. Experiment with different print speeds to find the sweet spot between speed and quality. Ensure proper nozzle checks are performed regularly to prevent clogging and maintain consistent print output. Consider the media type setting within your printer software‚ selecting the appropriate profile for your chosen DTF film. Careful calibration and consistent settings are key to repeatable‚ professional results.
Designing for DTF Transfers: Artwork Considerations
When preparing artwork for DTF transfers‚ several key considerations ensure optimal results; Designs should ideally be created in vector format for scalability and sharpness. If using raster images‚ maintain a resolution of at least 300 DPI to prevent pixelation. Outline fonts are essential to avoid rendering issues during printing.
Be mindful of color palettes; DTF inks may not perfectly match all Pantone colors‚ so careful color selection is vital. Avoid extremely fine lines or intricate details that may not transfer cleanly. Consider adding a slight border around your design to account for potential slight shifts during the transfer process. White underbase layers are often necessary for vibrant colors on dark garments. Simplify complex designs where possible to improve transfer reliability and longevity.

The Transfer Process: Heat Press Settings
Achieving successful DTF transfers hinges on precise heat press control; temperatures typically range from 280°F to 350°F‚ with medium to heavy pressure applied for 9-12 seconds.
Optimal Temperature Settings for DTF
Determining the ideal temperature for Direct-to-Film (DTF) transfers is crucial for vibrant‚ lasting results. Generally‚ a temperature range of 320°F to 350°F (160°C to 177°C) proves most effective‚ though slight adjustments may be necessary based on your specific equipment and the fabric type. For polyester fabrics‚ a range of 280-300°F (140-150°C) is recommended‚ while blends often benefit from 320-350°F (160-180°C).
It’s important to note that handheld presses may require a setting around 320°F. Always begin with a test transfer to fine-tune the temperature. Insufficient heat can lead to poor adhesion‚ while excessive heat risks scorching the fabric or causing color distortion. Monitoring the transfer process closely and referencing manufacturer guidelines for both your DTF film and heat press are essential steps for optimal performance. Consistent temperature control is key to achieving professional-quality DTF transfers.
Transfer Time: Finding the Sweet Spot
Establishing the correct transfer time is paramount for successful DTF applications. While a standard recommendation often falls around 9-12 seconds‚ the “sweet spot” can vary depending on factors like fabric composition‚ heat press quality‚ and the specific DTF film used. Polyester fabrics generally require a shorter duration‚ around 10-12 seconds‚ while cotton and blends may benefit from the full 12 seconds.
Initially‚ start with the recommended 9 seconds and carefully inspect the transfer. Insufficient time can result in incomplete adhesion‚ causing the design to peel or fade. Conversely‚ extending the time excessively might lead to color distortion or scorching. Performing test transfers on scrap fabric is crucial to identify the optimal duration for your setup. Consistent pressure and temperature‚ alongside precise timing‚ are vital for achieving a durable and visually appealing DTF transfer.
Pressure Settings: Achieving Proper Adhesion
Achieving proper adhesion with DTF transfers hinges on applying the correct pressure during the heat pressing process. Generally‚ a medium to heavy pressure setting is recommended‚ ensuring consistent contact between the DTF film‚ garment‚ and heat platen. Insufficient pressure can lead to poor ink transfer and a weak bond‚ resulting in the design lifting or cracking after washing.
However‚ excessive pressure isn’t always beneficial. It can cause the ink to spread‚ distorting the design or even bleed into the fabric. The ideal pressure allows for complete ink deposition without compromising image clarity. Experimentation with test transfers is key‚ adjusting the pressure incrementally until optimal adhesion is achieved. Remember to consider the fabric type; heavier fabrics may require slightly increased pressure compared to lighter materials. Consistent‚ even pressure across the entire design is crucial for a professional-looking‚ long-lasting result.
DTF Heat Press Settings for Different Fabric Types
DTF transfer success relies heavily on tailoring heat press settings to the fabric composition. For polyester fabrics‚ a temperature range of 280-300°F (140-150°C)‚ a transfer time of 10-12 seconds‚ and medium to heavy pressure yield excellent results; Blend fabrics‚ commonly cotton-polyester mixes‚ require slightly higher temperatures‚ typically 320-350°F (160-180°C)‚ with the same 10-second transfer duration and medium-heavy pressure.
Cotton fabrics generally need the highest temperatures‚ around 320°F (160°C)‚ and a transfer time of 10 seconds. Some sources suggest 320F for handheld presses. Always perform test transfers to fine-tune settings. Remember that these are guidelines; variations exist based on fabric weight and specific ink formulations. Consistent pressure is vital across all fabric types. Adjustments may be needed based on the garment’s color and weave to achieve optimal adhesion and vibrancy.
Polyester Fabrics
Polyester presents a smooth surface ideal for DTF transfers‚ but requires precise heat application. Optimal temperature settings fall within the 280-300°F (140-150°C) range‚ ensuring the ink bonds effectively without scorching the material. A transfer time of 10-12 seconds is generally recommended‚ allowing sufficient heat penetration for a durable and vibrant print. Employing medium to heavy pressure is crucial for achieving proper adhesion‚ pressing the transfer firmly onto the polyester fibers.
It’s important to note that lower melting points of polyester necessitate careful temperature control. Overheating can cause the fabric to distort or melt. Always conduct test transfers on scrap polyester to verify settings before applying to the final garment. Consistent pressure throughout the transfer process is vital for uniform ink distribution and a professional finish. Consider fabric weight; lighter polyesters may require slightly lower temperatures.
Cotton Fabrics
Cotton‚ a widely used fabric‚ demands higher temperatures for successful DTF transfers compared to polyester. Recommended settings typically range from 320-350°F (160-180°C)‚ providing the necessary heat to fully cure the ink and bond it to the cotton fibers. A transfer time of 10-15 seconds is generally advised‚ allowing ample time for the ink to penetrate the fabric’s texture. Medium to heavy pressure is essential‚ ensuring consistent contact between the transfer film and the cotton surface.
Due to cotton’s absorbent nature‚ pre-pressing the garment is highly recommended to remove any moisture and create a smoother surface. This enhances ink adhesion and prevents potential issues like bubbling or cracking. Always perform test transfers on scrap cotton to fine-tune settings based on fabric weight and color. Consistent‚ even pressure is key to achieving a vibrant‚ long-lasting print on cotton materials.
Blend Fabrics
Blend fabrics‚ combining cotton and polyester‚ require a balanced approach to DTF transfer settings. Typically‚ a temperature range of 320-350°F (160-180°C) proves effective‚ accommodating both fiber types. Transfer times should fall between 10-12 seconds‚ allowing sufficient heat for proper ink adhesion without scorching the material. Applying medium to heavy pressure is crucial for ensuring a strong bond between the DTF film and the blended fibers.
The specific cotton/polyester ratio significantly impacts optimal settings. Higher polyester content leans towards lower temperatures‚ while more cotton necessitates higher heat. Pre-pressing the garment remains vital for removing moisture and creating a smooth surface. Always conduct test transfers to dial in the perfect combination of temperature‚ time‚ and pressure for your specific blend composition‚ guaranteeing a durable and vibrant final result.

Step-by-Step DTF Transfer Guide
Follow these crucial steps: pre-press garments‚ carefully apply the DTF transfer‚ and then post-press with cooling for lasting adhesion and vibrant‚ durable prints.
Pre-Pressing the Garment
Pre-pressing is a foundational step for successful DTF transfers‚ often overlooked but critically important for optimal adhesion and a professional finish. Begin by thoroughly inspecting the garment for any moisture; even slight dampness can severely hinder the transfer process‚ leading to peeling or poor ink bonding. Utilize a heat press to remove wrinkles and any residual moisture from the fabric.
Set your heat press to approximately 320°F (160°C) and press the garment for 5-10 seconds. This initial press serves multiple purposes: it flattens the fibers‚ creating a smoother surface for the transfer film‚ and activates any sizing or finishes on the fabric‚ allowing for better ink absorption. Ensure even pressure distribution across the entire garment area where the transfer will be applied. A properly pre-pressed garment will dramatically improve the longevity and vibrancy of your DTF transfer‚ minimizing the risk of common issues like bubbling or cracking.
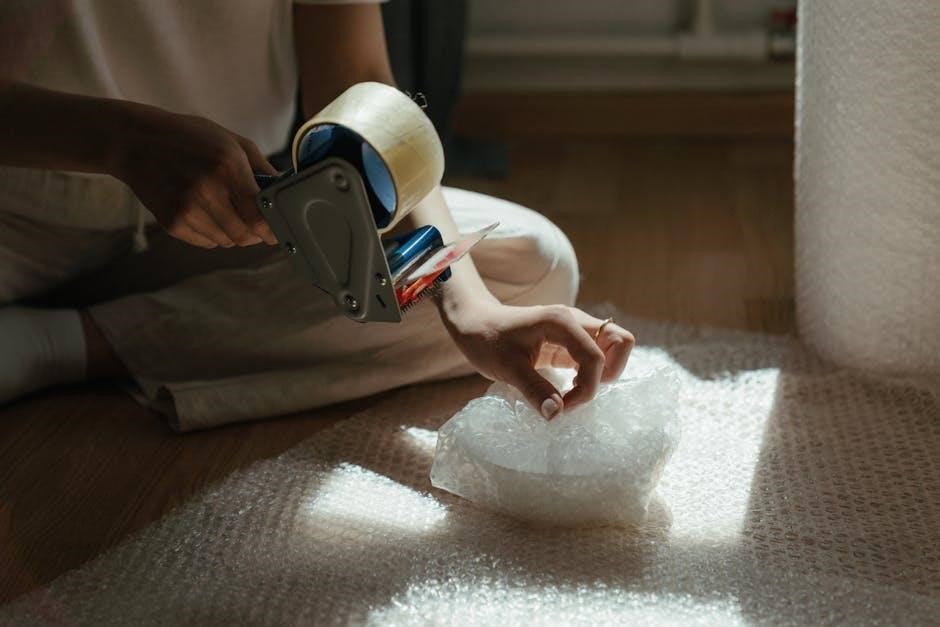
Applying the DTF Transfer
After pre-pressing‚ carefully position the DTF transfer film onto the garment‚ ensuring the printed side faces down towards the fabric. Precise alignment is crucial‚ so take your time and double-check before proceeding. Once positioned correctly‚ cover the transfer film with a sheet of parchment paper or Teflon sheet – this protects both the heat press platen and the transfer itself from sticking.
Apply firm‚ even pressure with the heat press‚ utilizing the settings appropriate for the fabric type (refer to the fabric-specific guidelines). Generally‚ a medium to heavy pressure is recommended for optimal adhesion. Press for the designated time‚ typically between 9-12 seconds at temperatures ranging from 280°F to 350°F (140°C to 177°C)‚ depending on the material. Consistent pressure and temperature are key to a successful and durable transfer.
Post-Pressing and Cooling
Immediately following the heat press cycle‚ carefully lift the platen and remove the parchment paper or Teflon sheet while the transfer is still hot. Depending on the film type and desired effect‚ peeling can be done hot‚ warm‚ or cold – always consult the film manufacturer’s instructions. If peeling warm‚ allow a brief cooling period before gently lifting a corner to test adhesion.
If any areas appear to be lifting‚ replace the parchment paper and apply a short‚ focused re-press (approximately 3-5 seconds) to those specific spots. Allow the garment to cool completely before handling or washing. Avoid stretching or manipulating the transferred area during cooling‚ as this could cause cracking or distortion. Proper cooling ensures the ink fully bonds with the fabric‚ maximizing durability and washability.

Troubleshooting Common DTF Transfer Issues

Common problems include poor adhesion‚ color fading‚ and film residue; addressing bubbling or cracking requires adjusting temperature‚ pressure‚ or transfer time for optimal results.

Transfer Not Sticking Properly
If your DTF transfer isn’t adhering correctly to the fabric‚ several factors could be at play. First‚ verify your heat press temperature; it might be too low‚ especially for polyester or blend fabrics‚ requiring settings between 320-350°F (160-177°C). Insufficient pressure is another common culprit – ensure medium to heavy pressure is applied consistently across the entire transfer area.
Also‚ confirm the pre-pressing step was adequately performed. A properly pre-pressed garment removes moisture and creates a smoother surface for better adhesion. Check the transfer time; 9-12 seconds is generally recommended‚ but thicker materials may need slightly longer. Finally‚ ensure the DTF film is compatible with your chosen fabric and that your printer settings are optimized for vibrant‚ durable prints. A test transfer on scrap fabric is always advisable before committing to a full garment.
Color Fading or Distortion
Color fading or distortion in your DTF transfers often points to issues within the printing or heat pressing stages. Begin by examining your printer settings; ensure you’re using a high-quality print resolution and the correct color profile for vibrant‚ accurate results. Lower temperatures‚ particularly below 320°F (160°C)‚ can lead to incomplete ink curing and subsequent fading.
Inconsistent pressure during heat pressing can also cause uneven color distribution and distortion. Verify medium to heavy pressure is applied uniformly across the entire design. Furthermore‚ the fabric type influences color vibrancy; polyester generally yields brighter colors than cotton. Consider slightly increasing the transfer time‚ but avoid excessive heat‚ which can scorch the fabric and degrade the print quality. Always perform test prints to calibrate your settings.
Film Residue After Transfer
Film residue remaining after a DTF transfer typically indicates insufficient heat or pressure during the pressing process. Ensure your heat press reaches the recommended temperature – generally between 320°F (160°C) and 350°F (177°C) – and maintains it consistently throughout the transfer duration. Applying adequate pressure‚ ranging from medium to heavy‚ is crucial for fully bonding the ink to the fabric and dissolving the adhesive on the film.
If residue persists‚ slightly increase the pressing time by a few seconds‚ but avoid overheating‚ which could damage the garment. The quality of the DTF film itself can also contribute to residue; using a reputable brand with a clean release layer is essential. Cold peeling can sometimes leave residue‚ so allow the transfer to cool slightly before attempting removal. Gentle washing after proper cooling can help eliminate any remaining traces.
Addressing Bubbling or Cracking
Bubbling and cracking in DTF transfers often stem from moisture trapped within the garment or uneven heat distribution during pressing. Always pre-press the fabric to eliminate excess moisture and ensure a smooth‚ flat surface. Verify your heat press platen is clean and free of debris‚ providing consistent contact across the entire transfer area.
Inconsistent pressure can also cause these issues; confirm even pressure application throughout the transfer process. If bubbling occurs‚ reduce the pressing temperature slightly and increase the pressing time to allow the ink to fully adhere. For cracking‚ particularly on stretchable fabrics‚ ensure the ink is properly cured by slightly increasing both temperature and time. Using a high-quality DTF film and appropriate wash instructions post-transfer will also minimize these problems‚ extending the transfer’s lifespan.

DTF Transfer Care and Maintenance
Follow washing instructions carefully to maintain vibrancy; proper care extends DTF transfer longevity. Store transfers in a cool‚ dry place‚ avoiding direct sunlight and extreme temperatures.
Washing Instructions for DTF Transfers
To ensure the longevity and vibrancy of your Direct-to-Film (DTF) transfers‚ adhering to specific washing guidelines is crucial. Always turn garments inside out before laundering. This minimizes friction and direct contact with the printed design‚ protecting it from premature wear and tear.
Use a mild detergent‚ avoiding harsh chemicals‚ bleach‚ or fabric softeners‚ as these can break down the adhesive and fade the colors. A gentle cycle with cold water is highly recommended; hot water can cause the transfer to crack or peel.
Avoid prolonged soaking and vigorous scrubbing. When the washing cycle is complete‚ gently reshape the garment and either hang it to dry or tumble dry on a low heat setting. High heat can damage the transfer. Do not iron directly over the DTF print; if ironing is necessary‚ turn the garment inside out or use a protective cloth.
Repeatedly following these simple steps will significantly extend the life of your DTF transfers‚ keeping your designs looking fresh and vibrant wash after wash.
Longevity of DTF Transfers
Direct-to-Film (DTF) transfers‚ when applied and cared for correctly‚ demonstrate impressive durability. While not impervious to wear‚ a properly executed DTF print can withstand a significant number of wash cycles – typically ranging from 50 to 100 washes‚ and potentially more with diligent care.
The lifespan is heavily influenced by several factors‚ including the quality of the film‚ the ink used‚ the precision of the heat press application (temperature‚ time‚ and pressure)‚ and‚ crucially‚ the washing practices employed by the end-user.
Fabric type also plays a role; polyester generally exhibits superior wash resistance compared to cotton or blends. Avoiding harsh detergents‚ excessive heat during drying‚ and direct ironing over the print will maximize the transfer’s longevity;

In essence‚ a combination of quality materials‚ proper application‚ and conscientious garment care will ensure your DTF designs remain vibrant and intact for an extended period.
Storing DTF Transfers
Proper storage of DTF transfers is crucial for maintaining their quality and ensuring successful application. Unused transfers are sensitive to environmental factors like humidity‚ temperature fluctuations‚ and direct sunlight‚ all of which can degrade the adhesive and print quality;
Ideal storage conditions involve keeping transfers in a cool‚ dry‚ and dark location. A temperature-controlled environment‚ ideally between 65-75°F (18-24°C)‚ is recommended. Avoid storing them in areas prone to moisture‚ such as basements or garages.
Transfers should be stored flat‚ preferably in their original packaging or within acid-free sleeves to prevent sticking or damage. Avoid folding or creasing the film‚ as this can compromise the print.
Long-term storage exceeding six months is not generally advised‚ as adhesive performance may diminish over time. Regularly inspect stored transfers for any signs of deterioration before use.
Related Posts

polar ice therapy 3.0 set setup instructions
Need help setting up your Polar Ice Therapy 3.0? We’ve got the simple, step-by-step instructions you need to get back to feeling your best, fast! Get recovery rolling.
mini keurig instruction manual
Discover how to use your Mini Keurig with our simple instruction manual. Perfect for coffee lovers!
jimmy dean sausage egg and cheese biscuit cooking instructions
Learn how to cook Jimmy Dean sausage, egg, and cheese biscuits perfectly. Quick, easy, and delicious breakfast on the go!